Showing posts with label Organization. Show all posts

Wednesday, April 24, 2013

DIY Table Caddy


 Make your own table caddy with an old wine carrier and some empty tin cans.

 Dress it up with some spray paint and come deco duck tape

First make sure that you have all of the glue off the cans.  If you have any glue left on the cans the paint will not dry and remain very sticky.

The best way to get the glue off is to wipe a thick layer of mayo on the area and let it sit over night.  Wipes right off.


 Spray paint the outside and inside surfaces of the wine carrier and paint the outside surface of the cans.


 Now that the paint is dry it is time to have some fun with colorful duck tape.

On the cans take a strip of duck tape that will fit around half the can.  Place the duck tape halfway on the outside top edge of the can and roll the edge down to the inside of the can.

 This will prevent any tiny finger from getting cut on the edges of the can.

 Reinforce the box by adding duck tape to the inside bottom of the box.  Make sure that all of the areas that fold up have been taped down.


 Also reinforce the bottom of the box to give it that added strength.


Use the same colorful duck tape to the edges of the wine box.  Or add your own personal touch!


 Fill the cans with the necessities for small group time or any time.


 Our caddy has twist up crayons, colored pencils, child scissors, dry markers, thin tip markers and colored sharpies.

The great thing about this caddy is that the cans come out for easy pass around and you have everything need for small group. 

I will be creating these for every small group table for next school year.


Thursday, October 18, 2012

Small Group Trays

When it comes to teaching young children you have to be prepared or mishaps and problems will occur.  One way to keep things running smoothly is having everything ready and at your fingertips.  Small group trays are one way you can be prepared for your little ones.


In my class each color group has a color tray.  Each tray has name plates, letter formation directions (Treasures) and a caddy with all the essentials.  (scissors, dry erasable markers, colored pencils and crayons)


Each group has a different activity that gets rotated throughout the week.  Everything that is need for that activity fits perfectly in each groups tray.  We just have to grab and go.


Tuesday, September 11, 2012

Parent Helper Totes


This year I have started a parent helper tote system.

 These totes are placed right under the sign in and out area.  Parents can pick a tote that contains different tasks that parents can do at home to help with their child's classroom.  This is very helpful to me since all of my parents are working parents.  (They have to be working in order to eligible for the program)


 One of the most busiest tote box is the Pencil Sharpen   box.  This box makes it home to one helpful parent every night.  In the box is an electric pencil sharpener and pencils that need to be sharpened from the writing center, small group baskets and other areas that we always have pencils for the children to use.


Another helpful parent tote is our monthly Book Order.  This tote goes home once a month to the same parent.  At the beginning of the year I had my families fill out a parent volunteer questioner, this gave me information on which parents were willing to take on different classroom jobs for me. 

 Here is a list of the tote boxes that we currently have up and running in our classroom.


Pencil Sharpen Helper
Check Marker Helper
Booklet Maker Helper
Book Order Helper
Glue Bottle Washer
Public Library Helper

To download Tote Box Labels for free go to...


 You can find more classroom management ideas and forms in my Classroom Management Theme Packet on


Friday, August 17, 2012

Name Tag Station


Our name tag station is by the children's  cubbies.  As children come in parents and child find name tag.  We have the parents talk with their child about their names.  Here are things that they talk about...


What color is your name tag?
What is your first and last name?
What letter does your name start with?
How many letters are in your name?
Are there any other children in your calls with the same first letter in their name?
What letters are in your name?

Why do you use name tags?

*   They help me manage my small groups.  Children are able to identify their group by the color of their name tag.

*   It is also a great way to see which children still need to come in for the day at a glance.  It also lets you see who is absent for the day at a glance.

*   When you have a parent volunteer they are able to call children by their names.

 Down load for Free


 Name tags come in four colors

I used the Thermal Laminating Pouch name bags


I used the GBC New Heat Seal Creative Laminator to laminate all of my name tags.  These name tags are much more durable then in you laminate them with a traditional laminating machine. 


Friday, February 24, 2012

Work Planner


Have you ever seen a computer with sticky notes stuck all the way around it and sticky notes on top of sticky notes?  OK so I like sticky notes.  Well that is what my computer use to look like until I started the clutter-free classroom.  So what do I now do you ask?  OK you did not ask but I want to share it with you anyway.  I now place those sticky notes in a spiral notepad. 

When it is opened up it looks like this.  On the top of each page it reads February Must Do and February Work In Progress.  By the end of the month my must do side needs to be empty and Work In Progress side gets moved to the new month or it says right where it is.  If is stays it is something that I wanted to get done based on that theme or holiday that is always done during the same month every year.  I do this so that I can refer back to this month to see what my ideas were and if I would still like to do them or discard them.  Why rack the brain and think about it all over again when it could be right there at my finger tips.

Why do I choose to use sticky notes for this?  I like the idea of them because I can make my list or add to my list through out the month and the biggest reason when I have finished something from the list it feels great to pull it off, crumple it up and toss it into the trash can.  I do not have to look at it again. 

With a traditional list you make it, scratch on it and them have to keep rewriting it as you go along.  To Much Work!

Original Idea came from a picture on pinterest.


Saturday, February 4, 2012

Clutter-Free Classroom Project Week 5


My favorite type of storage…
·        
      Baskets (they give a natural look)
·         Plastic Bins in all sizes
·         Zip Lock Bags (to hold all the pieces)
·         Dish Pans for children’s area (durable)
·         Large Mailing Envelopes
·         Anything Free or for a Dollar

Large Mailing Envelopes
I use these for my workstations projects/Games.  You are able to tape the instructions and what is inside the envelop to the outside front.  Once I have all of my workstations figured out and put together I place them in a plastic bin upright so that I can thumb through the easily and grab what is needed in a snap. 

Plastic Bins


Plastic bins are great for storing and organizing all of my paper work.  This tub shelf in near my desk each tub has its own job.  (Current  Communication Folder packets clipped together my week, Next Month Communication Folder, Extra Communication folders that are ready to go for new students, Sub Teacher which is placed on my desk at the end of the day Idea from Clutter Free Classroom Project, Parent Orientation Packets for new parents and, Extra Stock of office supplies) 
This is a new system that I started after working on the Clutter Free Classroom Project and I have to say I love it.  I always know where to place and find things.  This has saved me some valuable time. 

My desk now looks like this…


It did look like this…


Large Plastic Bins 

Store everything that is needed for a unit into one bin.  Our curriculum goes by one theme a month, but we add to each unit depending on the month and season.  So every thing for that month is in that unit box.

Saturday, January 28, 2012

Clutter-Free Classroom Project Week 4

This week we were suppose to concentrate on our Teacher Desk area but I choose to do my group meeting area since it is the hub of my classroom.

Before Picture
All of my CD’s were on top of my stereo area even though you can not see it in this picture and all of the under cabinets had teacher stuff in them from previous teachers that I have never gone through since being back in the classroom.  So this area was a big one for me because I would keep all of my stuff on top of cabinets and were every I could place them.  (This was not working I could never find what I need in a hurry)

After Pictures

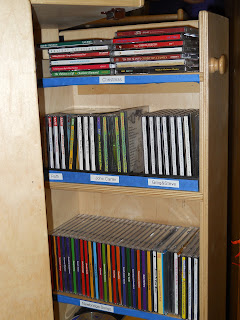
 Everything is now organized and in the cabinet below or in the TV cabinet picture to follow.


The side doors were full of cassette tapes (I know who uses those now days, but that is what was in there)  I had to remove black strips so that the CD case would fit in there.  Once I had all of my CD’s organized by artist I labels each section so that I can find what I am looking for in a snap.
In the middle of my cabinet I now have my transition games, storytelling kits, dancing ribbons, mini maracas and rhythm sticks.


The closed door TV cabinet that sits next to my stereo cabinet now houses VHS tapes, Pom Poms, transition dice, dancing scarves, dramatic props for retelling stories and sacks for sack races.

The Finished Area


Pre-K - TeachersPayTeachers.com  

Saturday, January 14, 2012

Week #2 Clutter-Free Classroom Project

The challenge this week was to come up with our plan of how we will become clutter free.  This plan also has to have rules to help you get clutter free so her are my rules for my self to get and stay clutter free.


1     1.)  I will use up all of the consumables that I have before getting more.
2     2.)  I will limit donated items for creative art projects.
3     3.)  If it is broken, get rid of it.
4     4.)  If I have not used it in a year get rid of it or donate to another teacher.
5     5.)  If it is in the wrong place return it now, instead of later.

I have an over amount of consumables since classrooms were closed down after the budget cutes and they had to put it some where so it is in my classroom storage.  Here is the before pictures.

It is hard to get to one color when there are other colors stacked on top.  Some times I walk in there and just change my plan instead of getting what I came in for.

After Pictures


 I went to the surplus warehouse (shed) and found some discarded shelving and placed the shelving in the storage room.  I stacked two shelves on top of one another and attached the shelving to the wall with L brackets.  The best thing about this organizational project is that it was FREE!
I also found some paper sorting racks in the surplus shed.  I cleared off a shelf in the storage next to the surplus of construction paper and placed the paper sorting racks on the shelf and placed all the opened papers in it.  This way I will use what I have up before getting out more.  

Pre-K - TeachersPayTeachers.com   

LinkWithin

Related Posts with Thumbnails